
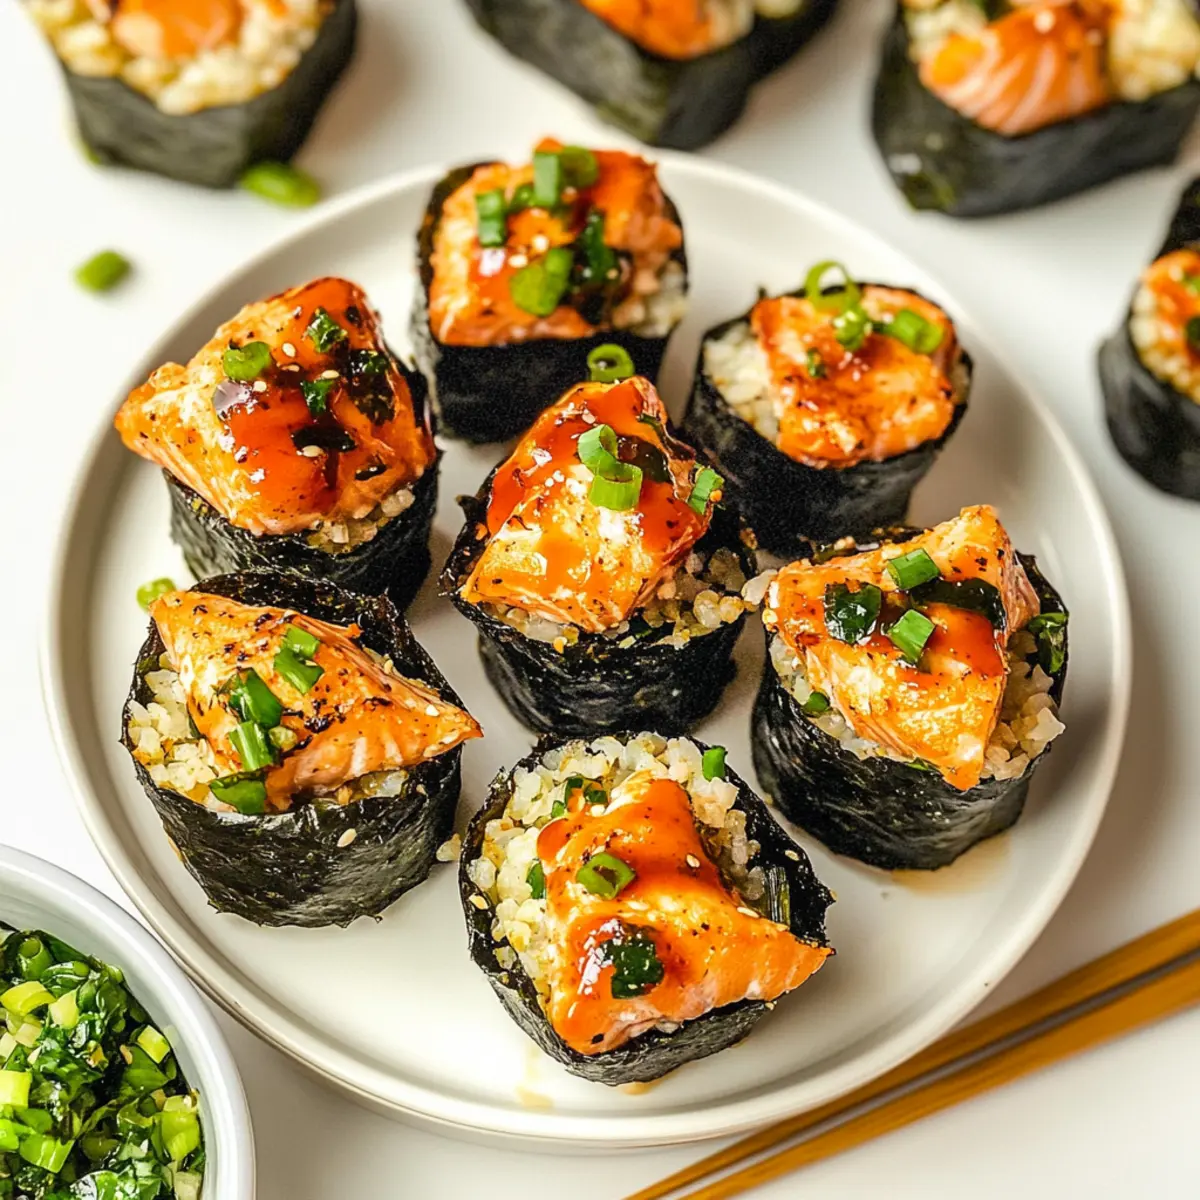
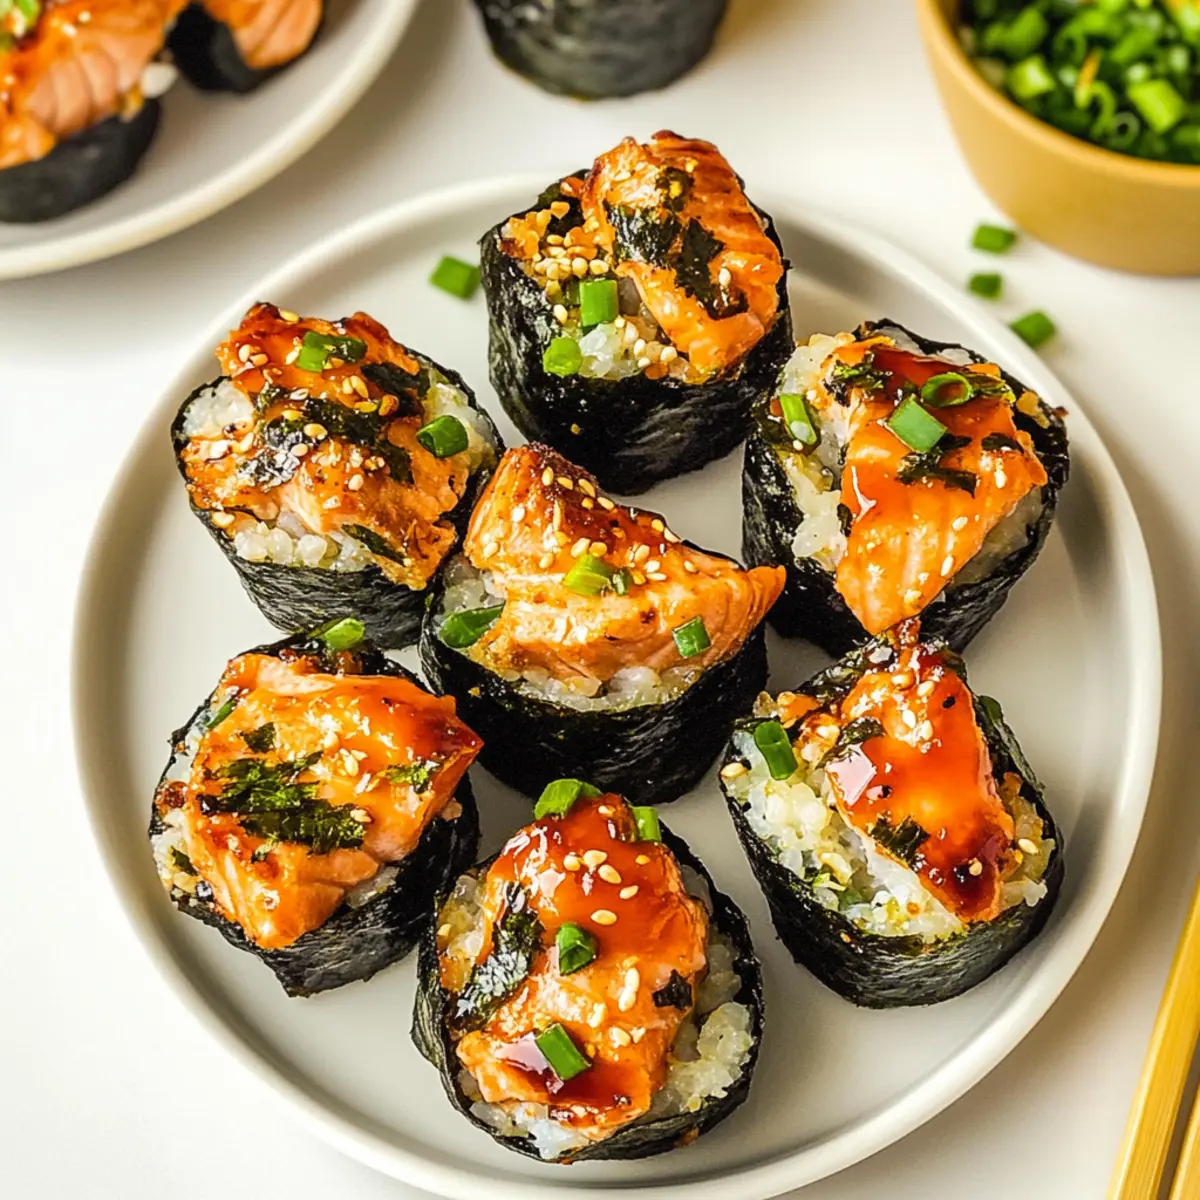
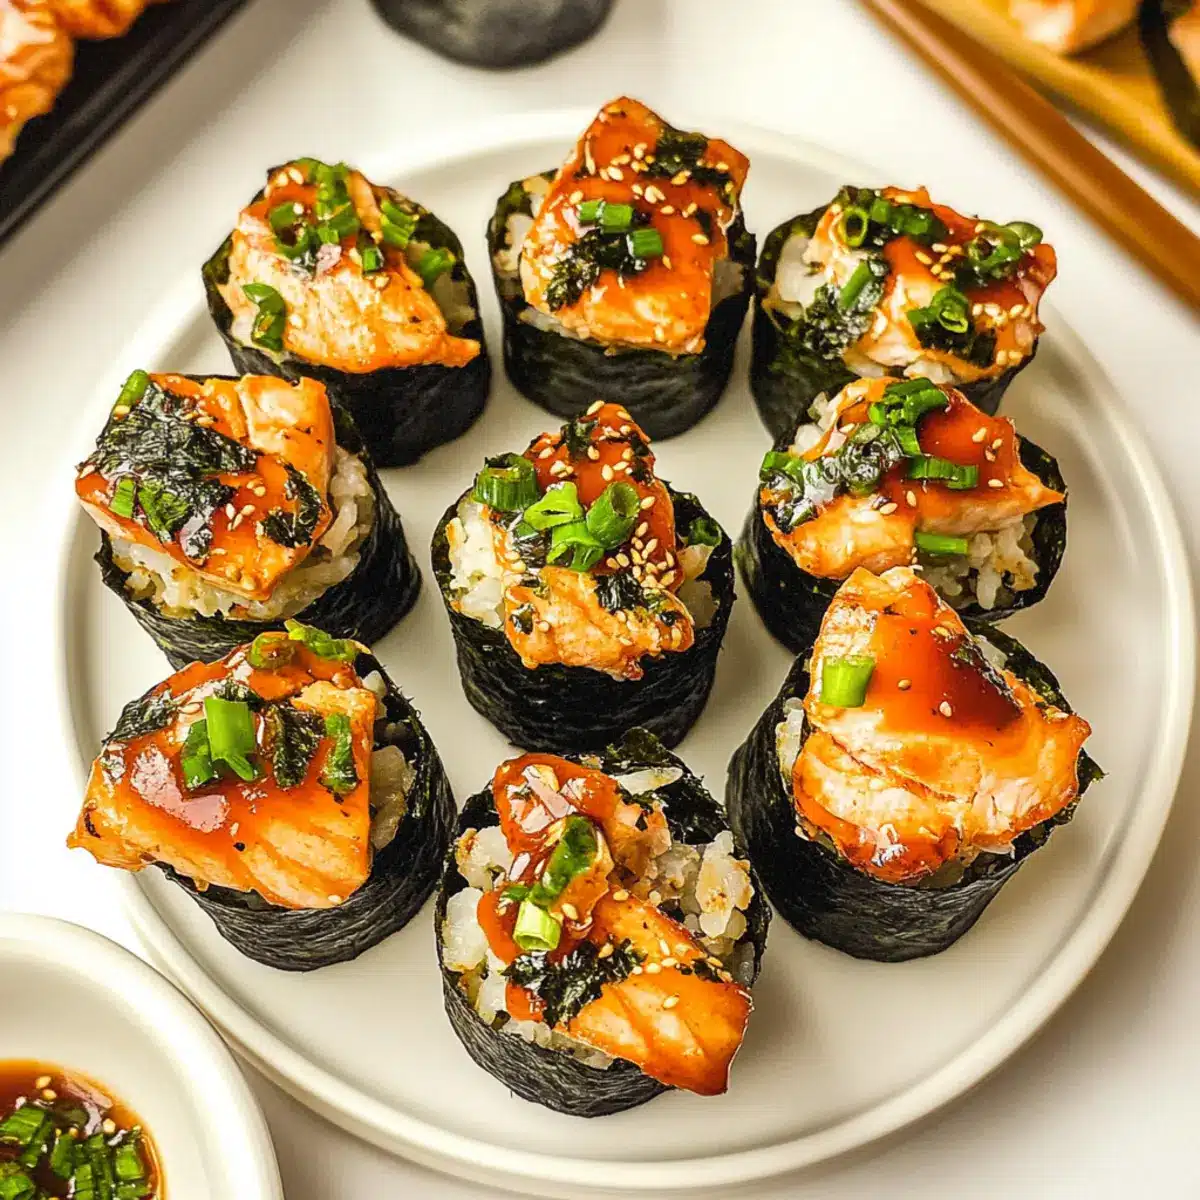
As I watched my feed scroll by, a colorful video caught my eye—a vibrant display of Easy Baked Salmon Sushi Cups twinkling like little gems. This TikTok sensation puts a delightful twist on traditional sushi, offering a fun and approachable way to indulge in its flavors. Imagine sinking your teeth into these delectable bite-sized treats, where tender salmon plays the star alongside fluffy sushi rice, all cradled in crispy nori sheets. Not only are these cups super quick to throw together, but they’re also a guaranteed crowd-pleaser at gatherings or simply a fun snack for those late-night cravings. Curious how to make them? Let’s dive in!
Why Are These Sushi Cups So Irresistible?
Unique Twist: These Easy Baked Salmon Sushi Cups blend traditional sushi elements with a modern, baked format, making sushi more fun and accessible.
Crowd-Pleaser: Perfect for gatherings, they are sure to impress your friends and family as a memorable appetizer.
Quick & Easy: With minimal prep time, you can have these out of the oven in under 30 minutes, fitting perfectly into a busy lifestyle.
Flavor Explosion: The combination of tender salmon, fluffy sushi rice, and crunchy nori offers an incredible mix of textures and savory flavors that will leave everyone yearning for more.
Versatile Base: Feel free to mix in your favorite veggies or proteins, like avocado or shrimp, making these cups adaptable to various dietary preferences!
Easy Baked Salmon Sushi Cups Ingredients
For the Salmon Mixture
• Salmon – Choose fresh, high-quality salmon for the best flavor and texture.
• Light Soy Sauce – Enhances the salmon’s natural umami flavor; low-sodium is a fine alternative.
• Kewpie Mayo – Adds creaminess and a hint of sweetness; regular mayo can be used in a pinch.
• Sriracha – Adds a delightful kick; adjust to your spice preference!
• Sesame Oil – Provides a nutty aroma; olive oil works well for a milder taste.
For the Sushi Rice
• Sushi Rice – The heart of the sushi cup; jasmine rice can be a tasty substitution.
• Rice Vinegar – Essential for flavoring the sushi rice; always mix with sugar for best results.
• White Sugar – Balances the acidity of rice vinegar; honey or agave syrup can be excellent alternatives.
For the Nori Cups
• Nori Sheets – Creates the crispy shell for the cups; skip for a gluten-free option using baking cups.
• Cooking Spray – Prevents sticking in the muffin tins; olive oil can also be a great substitute.
For Garnish
• Furikake – A delicious Japanese seasoning blend that adds flavor and a pop of color; it’s optional but recommended!
• Green Onion – Offers a fresh crunch; substitute with chives if preferred.
These Easy Baked Salmon Sushi Cups are not just a visual treat but a delightful explosion of flavor! Enjoy crafting these delicious bites, and open the door to endless variations!
Step‑by‑Step Instructions for Easy Baked Salmon Sushi Cups
Step 1: Prepare Sushi Rice
Start by cooking sushi rice according to the package instructions—typically, this takes about 20 minutes. Once done, transfer the warm rice to a bowl and gently mix in rice vinegar and sugar, allowing the rice to cool slightly while absorbing the flavors.
Step 2: Preheat the Oven
Preheat your oven to 400°F (200°C) to ensure it’s hot and ready for your Easy Baked Salmon Sushi Cups. This high temperature helps achieve that perfect golden-brown finish while cooking the salmon through, so you can enjoy the delightful crispy texture.
Step 3: Prepare the Salmon Mixture
In a mixing bowl, combine cubed fresh salmon with light soy sauce, Kewpie mayo, sriracha, and sesame oil. Use a spatula to gently mix until well combined, ensuring every piece of salmon is coated in flavor. This mixture is what makes the sushi cups exceptionally tasty!
Step 4: Prepare Nori
While the oven preheats, cut nori sheets into rectangle pieces that can easily mold into muffin tins. Each piece should be large enough to cover the walls of the cup while leaving enough room for the sushi rice and salmon mixture.
Step 5: Assemble the Cups
Lightly grease the muffin tins with cooking spray to prevent sticking. Carefully press the nori rectangles into each cup, then fill them halfway with the seasoned sushi rice. Gently pack the rice before layering with the flavorful salmon mixture on top.
Step 6: Bake
Place the muffin tin in the preheated oven and bake for about 15 minutes. Look for the tops to turn golden brown and the salmon to become opaque, which indicates that everything is cooked through perfectly and ready to be enjoyed.
Step 7: Garnish & Serve
Once out of the oven, let the cups rest for a couple of minutes. Drizzle with extra sriracha or spicy mayo for an added kick, then sprinkle with furikake and diced green onions for garnish. These Easy Baked Salmon Sushi Cups are best served warm—it’s time to dig in!

Expert Tips for Easy Baked Salmon Sushi Cups
-
Choose Fresh Salmon: Use high-quality, fresh salmon to ensure a rich flavor and optimal texture in your sushi cups. Fresh salmon makes a world of difference!
-
Watch Your Portions: Don’t overfill the nori cups; leaving some space allows for proper cooking and easy serving. Aim for a balanced layer of rice and salmon.
-
Mix Well: Make sure to gently combine all salmon mixture ingredients thoroughly, ensuring each piece is coated in flavor. This step enhances the taste of your Easy Baked Salmon Sushi Cups.
-
Adjust Spiciness: Customize the amount of sriracha based on your preference for heat. Start with less and add more until it suits your taste!
-
Cool Before Serving: Let the sushi cups rest for a few minutes after baking. This cooling period makes them easier to handle while still warm and delicious.
-
Experiment with Fillings: Feel free to add vegetables like avocado or cucumber for extra crunch. Variations can elevate the flavor and nutrition of your Easy Baked Salmon Sushi Cups!
Easy Baked Salmon Sushi Cups Customization
Embrace your inner chef and add your unique touch to these delightful sushi cups for an even more exciting culinary adventure!
- Vegetable Boost: Add avocado or cucumber for a refreshing crunch that enhances texture and flavor. These vibrant veggies are not only tasty but also nutritious.
- Protein Swap: Substitute salmon with cooked shrimp or tofu for a delightful twist, catering to various dietary preferences. Each option brings its own unique flavor profile, ensuring everyone can enjoy these cups!
- Spicy Kick: Increase sriracha or add diced jalapeños for an extra fiery flavor that will tickle your taste buds. Perfect for heat lovers looking for that extra oomph in their sushi experience!
- Rice Alternatives: Use jasmine rice instead of sushi rice for a subtly different flavor and texture that beautifully complements the salmon. This switch can add a fresh perspective!
- Nori Alternatives: Omit nori sheets altogether for a gluten-free option; instead, use small baking cups to hold everything together while still keeping it fun and easy.
- Flavorful Garnish: Play around with different types of furikake blends or sprinkle sesame seeds on top to add that extra crunch and visual appeal; it’s all about the finishing touches!
- Saucy Variations: Experiment with different sauces like teriyaki glaze or spicy mayo drizzled over the tops for exciting new flavor combinations worth appetizing.
- Asian-Inspired Herbs: Use fresh cilantro or mint in your garnishes for a refreshing burst of aroma and flavor. These herbs can elevate your sushi cups beyond expectations!
Your creativity can take these Easy Baked Salmon Sushi Cups from good to extraordinary, making them your own signature dish that leaves a lasting impression!
Storage Tips for Easy Baked Salmon Sushi Cups
-
Room Temperature: Enjoy your sushi cups fresh from the oven. If they’re left out, consume them within 2 hours for food safety.
-
Fridge: Store any leftovers in an airtight container in the refrigerator for up to 2-3 days to maintain freshness and flavor.
-
Freezer: For longer storage, freeze wrapped sushi cups in plastic wrap, then place in a freezer-safe bag. They can last up to 2 months.
-
Reheating: Reheat in the oven at 350°F (175°C) for about 10 minutes, or microwave until warmed through, ensuring your Easy Baked Salmon Sushi Cups stay deliciously enjoyable!
What to Serve with Easy Baked Salmon Sushi Cups
Pair these delightful sushi cups with an array of dishes to create an unforgettable meal that excites the palate.
-
Cucumber Salad: A refreshing side that crunches with every bite, complementing the rich flavor of the sushi cups. The coolness of the cucumbers cuts through the salmon’s richness beautifully.
-
Miso Soup: This warm, savory soup adds comforting depth to your meal. Its umami flavors pair perfectly with the sushi cups, creating a harmonious balance.
-
Pickled Ginger: Bright and zesty, pickled ginger cleanses the palate between bites. Its sharp flavor enhances the overall experience of enjoying the sushi cups.
-
Edamame: Steamed and lightly salted, these young soybeans are a nutritious, tasty addition to your meal. Their subtle nuttiness pairs well with the salmon while offering a satisfying textural contrast.
-
Egg Drop Soup: Silky and warm, this soup provides a comforting foundation for your meal. Its delicate flavors won’t overpower the sushi cups, making it an elegant pairing.
-
Spicy Tuna Tartare: For those looking to elevate their sushi experience, a side of spicy tuna tartare offers a fresh twist. Its flavors echo those in the sushi cups, creating a cohesive dining experience.
Enjoy crafting the perfect meal with your Easy Baked Salmon Sushi Cups at the center of attention!
Make Ahead Options
These Easy Baked Salmon Sushi Cups are perfect for meal prep, saving you time on busy weeknights! You can prepare the sushi rice and salmon mixture up to 24 hours in advance. Simply cook the sushi rice according to package instructions, mix in the rice vinegar and sugar, and refrigerate. For the salmon, combine cubed salmon with light soy sauce, Kewpie mayo, sriracha, and sesame oil, then store it in an airtight container in the fridge. When you’re ready to serve, assemble the cups with prepped nori and fill them with the chilled rice and salmon mix before baking at 400°F for 15 minutes. This way, you’ll have delicious, freshly baked sushi cups with minimal effort!
Easy Baked Salmon Sushi Cups Recipe FAQs
How do I choose the best salmon for my sushi cups?
Absolutely! When selecting salmon, look for fresh, high-quality fillets. The flesh should be vibrant and firm, with no dark spots or an off smell. Wild-caught salmon is often recommended for its superior flavor and texture. If you opt for farmed, ensure it’s sustainably sourced.
What’s the best way to store leftover sushi cups, and how long do they last?
Leftover Easy Baked Salmon Sushi Cups can be stored in an airtight container in the refrigerator for up to 2-3 days. For best flavor, it’s recommended to consume them within the first day. Just remember to reheat in an oven at 350°F (175°C) for about 10 minutes to keep them delicious.
Can I freeze these sushi cups, and how should I do it?
Absolutely! To freeze your Easy Baked Salmon Sushi Cups, wrap each one individually in plastic wrap to prevent freezer burn. Then, place them in a freezer-safe bag. They can be stored for up to 2 months. When you’re ready to enjoy them, simply reheat in the oven without thawing, or let them thaw overnight in the refrigerator before reheating.
What if my sushi cups are falling apart after baking?
If your sushi cups are crumbling, it may be due to overfilling or the nori not being sturdy enough. Make sure to pack the sushi rice gently but firmly, leaving enough room at the top. To improve stability, lightly grease the nori sheets with cooking spray or olive oil before adding the rice and salmon mixture.
Are there any dietary considerations I should be aware of with this recipe?
Very! If you’re concerned about allergies, be cautious with soy sauce as it contains gluten. You can use low-sodium or gluten-free soy sauce to adapt. For those with seafood allergies, consider using cooked shrimp or tofu as a protein substitute. Additionally, ensure all ingredients for garnishing are allergy-free for sensitive individuals or to accommodate pets.
What can I do with leftover sushi rice?
If you have leftover sushi rice, you can store it in an airtight container in the fridge for up to 3 days. Plus, it makes for a lovely base for rice bowls or stir-fries. Alternatively, you could form it into rice balls (onigiri) or mix it into a salad for an easy lunch option!
Easy Baked Salmon Sushi Cups for a Tasty Twist on Sushi
Ingredients
Equipment
Method
- Prepare Sushi Rice: Cook sushi rice according to package instructions—about 20 minutes. Mix in rice vinegar and sugar, letting it cool slightly.
- Preheat the Oven: Preheat oven to 400°F (200°C) for perfect cooking.
- Prepare the Salmon Mixture: Combine salmon, soy sauce, Kewpie mayo, sriracha, and sesame oil in a bowl.
- Prepare Nori: Cut nori sheets into pieces for muffin tins.
- Assemble the Cups: Grease muffin tins, press nori pieces, fill with rice, and layer with salmon mixture.
- Bake: Bake in preheated oven for about 15 minutes until golden brown.
- Garnish & Serve: Let cool, drizzle with extra sriracha, and garnish with furikake and green onions.
Leave a Reply