
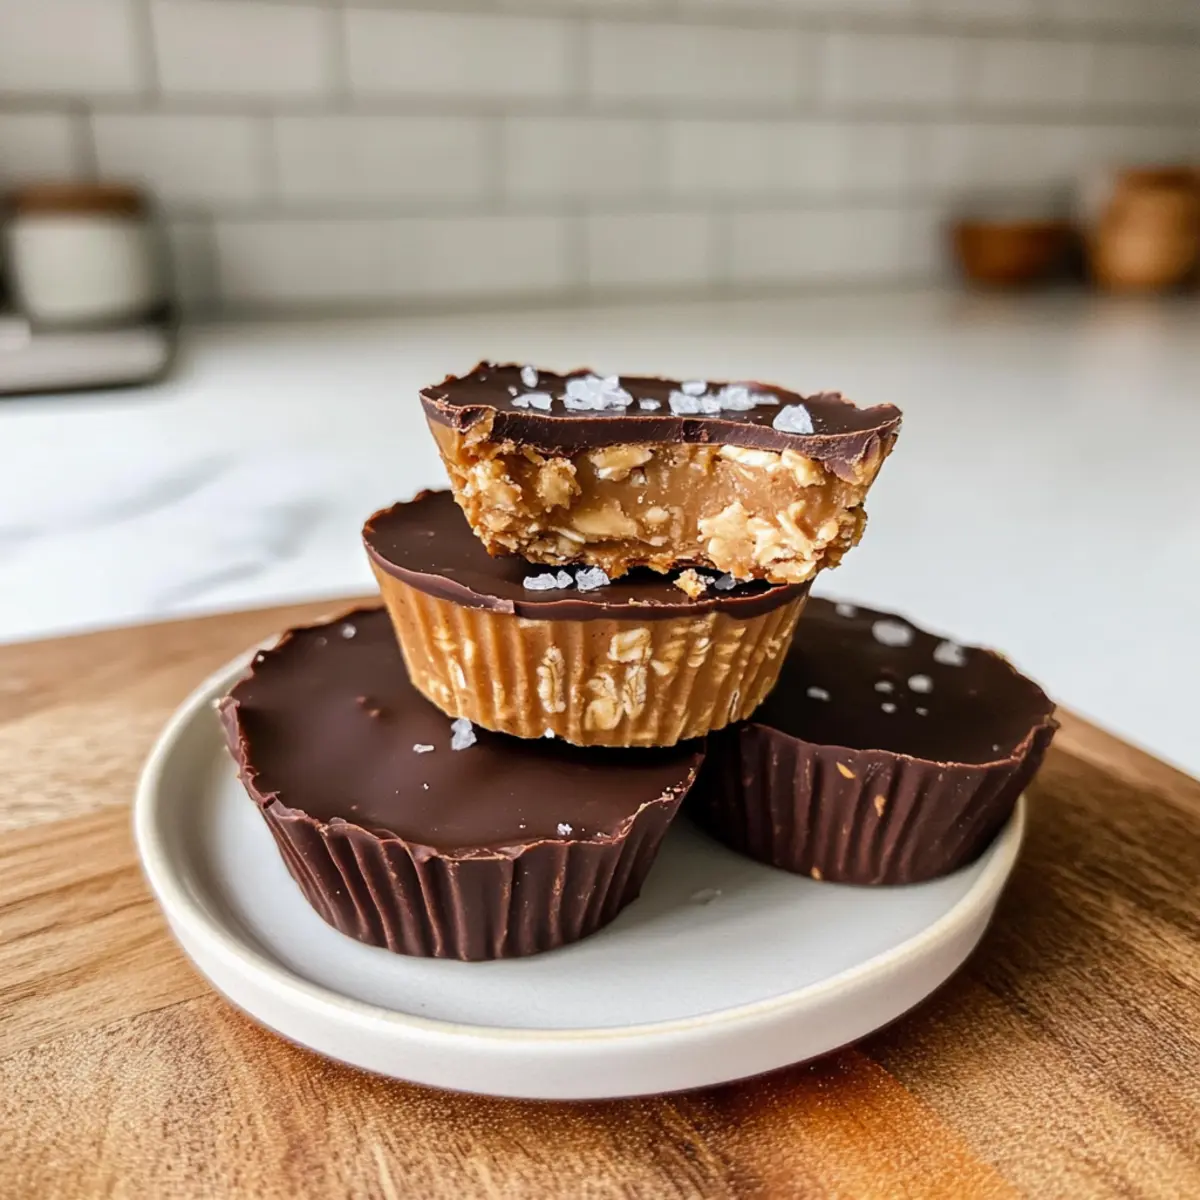
You know those moments when you’re craving something sweet, yet you also want it to be wholesome? That’s where these No-Bake Peanut Butter Oat Cups come in—crafted in under 20 minutes and perfect for busy days or satisfying midnight munchies. This recipe combines creamy peanut butter with chewy rolled oats, topped off with a drizzle of rich melted dark chocolate, offering a delightful twist on traditional snacks. The beauty of these Peanut Butter Oat Cups lies not only in their quick prep but also in their versatility; they’re vegan and gluten-free, making them a guilt-free indulgence you can tailor to your tastes. Imagine enjoying a treat that’s both health-conscious and utterly delicious—what could be better? Ready to learn how to whip up these mouthwatering cups? Let’s dive in!

Why Are Peanut Butter Oat Cups Irresistible?
Simplicity: These no-bake delights come together in just 20 minutes, making them the perfect last-minute treat to whip up.
Nutritious Goodness: Packed with wholesome oats and creamy peanut butter, they’re not just sweet but also satisfying—ideal for a quick energy boost.
Versatility: Customize them to your liking! Substitute peanut butter with sunflower seed butter for a nut-free variation or mix in some protein powder for an extra nutritional punch.
Decadent Yet Healthy: Indulge guilt-free with that rich chocolate topping, reminiscent of a traditional candy bar but made with wholesome ingredients.
Crowd-Pleaser: Perfect for sharing at gatherings or enjoying solo during a movie night; these treats are sure to please anyone who loves homemade snacks.
Elevate your baking game with these delicious peanut butter oat cups and check out our Storage Tips for keeping them fresh! Enjoy a sweet treat that’s as delicious as it is easy to prepare!
Peanut Butter Oat Cups Ingredients
Discover the delightful components that make these treats a wholesome snack!
For the Base
- Peanut Butter – Use creamy, all-natural peanut butter for the best flavor and texture; you can swap it with any nut or seed butter to make a nut-free version.
- Old Fashioned Rolled Oats – These provide the chewy foundation; certified gluten-free oats work beautifully if you need a gluten-free option.
- Maple Syrup – Adds just the right amount of sweetness; feel free to substitute this with honey or agave if that’s what you have handy.
For the Topping
- Chocolate Chips – Melted dark chocolate makes a luscious topping; if you prefer a different flavor, try milk chocolate or even white chocolate.
- Flaky Sea Salt – Optional, but a sprinkle on top enhances the flavor balance beautifully.
Grab these ingredients to whip up your own delicious Peanut Butter Oat Cups that everyone will love!
Step‑by‑Step Instructions for Peanut Butter Oat Cups
Step 1: Mix the Base
In a mixing bowl, combine 1 cup of creamy peanut butter and 1/3 cup of maple syrup. Use a spatula to blend them until the mixture is smooth and well integrated. This should take about 2 minutes. The consistency should be thick and creamy, perfect for holding the oat cups together.
Step 2: Add the Oats
Stir in 2 cups of old-fashioned rolled oats into the peanut butter mixture. Use a wooden spoon to mix until the oats are fully coated and evenly distributed, which should take another 2-3 minutes. The mixture will start to thicken, and you’ll notice a chewy texture coming together, a sign that your Peanut Butter Oat Cups will have a delightful bite.
Step 3: Shape the Cups
Line a muffin tin or use silicone molds for easy removal. Scoop about 2 tablespoons of the oat mixture into each cup, pressing down firmly to create an even base. Aim for a compact layer, ensuring they hold together well, which should take around 5 minutes. The base should look pressed down and slightly domed at the top.
Step 4: Freeze for Firmness
For the next step, place the filled molds in the freezer and let them sit for about 20 minutes. This will firm up the oat mixture, allowing it to set. You’ll know they’re ready when they feel solid and hold their shape well. This is essential for the next layer of deliciousness.
Step 5: Prepare the Chocolate Topping
While your Peanut Butter Oat Cups are firming up, melt 1 cup of chocolate chips with a splash of oil in a microwave-safe bowl. Heat in 30-second increments, stirring in between, for about 1-2 minutes total until smooth and glossy. The chocolate should have a silky texture, ready for drizzling.
Step 6: Drizzle the Chocolate
Once the oat cups are set, remove them from the freezer. Using a spoon, drizzle the melted chocolate over each cup, creating a luscious topping that enhances both flavor and appearance. Make sure each one is generously coated, which should take about 5 minutes. The chocolate should start to harden as it cools.
Step 7: Final Freeze and Serve
Return the cups to the freezer for another 20 minutes to allow the chocolate to fully set. After freezing, the Peanut Butter Oat Cups should be firm yet slightly soft to the touch. For an extra touch, sprinkle with flaky sea salt before serving if desired. Now, they are ready to be popped out of the molds and enjoyed!

What to Serve with No-Bake Peanut Butter Oat Cups
These delightful treats are not only perfect on their own but can also create a wonderful spread when paired with other delicious options.
- Fresh Fruit Medley: Serve with a vibrant mix of berries or slices of crisp apples for a refreshing contrast to the creamy richness.
- Creamy Yogurt Parfait: Layer these oat cups with Greek yogurt and your favorite fruit to elevate both flavor and texture, creating a satisfying breakfast or snack.
- Nutty Granola: A sprinkle of homemade or store-bought granola adds a delightful crunch and additional flavor to your dessert, enhancing the wholesome experience.
- Smoothies: Pair with a berry or banana smoothie for a balanced treat; the creamy texture of the smoothie complements the chewy oat cups perfectly.
- Coconut Chia Pudding: This tropical, creamy dish adds a fun twist, while its light texture complements the dense, rich cups beautifully.
- Coffee or Herbal Tea: A warm cup of coffee or a calming herbal tea enhances your snack time, making it a cozy moment of indulgence.
- Chocolate Drizzle Banana Slices: To accentuate the chocolate element, serve banana slices drizzled with melted chocolate for a double dose of sweetness.
Whether for a snack, dessert, or breakfast, these pairings make your Peanut Butter Oat Cups shine even brighter!
Make Ahead Options
These Peanut Butter Oat Cups are perfect for meal prep, saving you time on busy days! You can prepare the oat base and freeze it for up to 3 days. Simply follow the initial steps, press the mixture into molds, and place them in the freezer. When you’re ready to enjoy, melt the chocolate topping and drizzle it over the cups; then, freeze again for an additional 20 minutes to set the chocolate. To maintain that delicious texture, store the cups in an airtight container in the fridge for a softer treat or in the freezer for a firmer snack. With this make-ahead option, you’ll have a wholesome, easy-to-grab treat waiting for you whenever the craving hits!
Expert Tips for Peanut Butter Oat Cups
-
Choose the Right Peanut Butter: Use smooth, all-natural peanut butter for a perfect texture. Avoid runny varieties to ensure your cups hold together well.
-
Perfect Oat Consistency: Mix oats thoroughly into the peanut butter mixture to prevent clumping. This will create uniform Peanut Butter Oat Cups that are delightful to bite into.
-
Freezing Time Matters: Don’t skimp on freezing. Properly firming up the cups ensures they maintain their shape and gives the chocolate a base to adhere to.
-
Silicone Molds Work Best: Opt for silicone molds for easy removal. Metal tins may cause sticking, which can spoil your beautifully crafted Peanut Butter Oat Cups.
-
Creative Toppings: Experiment with flavor! Add nuts, dried fruits, or seeds on top before the chocolate sets to enhance texture and nutrition.
Storage Tips for Peanut Butter Oat Cups
-
Fridge: Store your Peanut Butter Oat Cups in an airtight container for up to one week; this keeps them soft and ready for snacking.
-
Freezer: For longer storage, freeze the cups in a single layer, then transfer to a container for up to three months. This way, you’ll have a delicious treat on hand whenever the craving strikes!
-
Defrosting: When you’re ready to enjoy, allow them to sit at room temperature for about 5-10 minutes to soften slightly for the best texture.
-
Reheating: There’s no need to reheat these no-bake treats; simply enjoy them cold or slightly softened for a delightful bite!
Peanut Butter Oat Cups Variations
Feel free to make these delicious Peanut Butter Oat Cups your own with these tasty twists and substitutions!
-
Nut-Free: Substitute peanut butter with sunflower seed butter for a delicious nut-free version everyone can enjoy.
-
Protein Boost: Add a few tablespoons of protein powder to the peanut butter mixture for an extra nutritious kick. This is a great way to make these oat cups a meal replacement or post-workout snack.
-
Sweetness Swap: Use honey or agave syrup instead of maple syrup. Each will bring a unique sweetness that pairs beautifully with peanut butter.
-
Chocolate Variations: Try using milk chocolate or white chocolate instead of dark chocolate for a sweeter topping. Each option will lend a different, delightful flavor to your treats!
-
Fruity Touch: Mix in some chopped dried fruits, like cranberries or apricots, for a chewy texture that complements the oats beautifully. These additional bits add a lovely tartness too!
-
Coconut Infusion: Stir in unsweetened shredded coconut for a tropical twist. This will give your Peanut Butter Oat Cups an extra layer of flavor and texture.
-
Spicy Kick: For those who love a little heat, consider adding a pinch of cayenne pepper or a dash of cinnamon into the peanut butter mix. It’s a surprising way to elevate the flavor profile!
-
Nutty Crunch: Top with a sprinkle of chopped nuts (like almonds or walnuts) before the chocolate sets. This gives your cups a satisfying crunch and extra nutrition.
With these variations, you can create your perfect treat! Whether you’re looking for a quick snack or a nutritious post-workout bite, these ideas will help you make your homemade Peanut Butter Oat Cups truly unforgettable. Speaking of unforgettable, don’t forget to check out our Serving Suggestions for even more ways to enjoy these delightful cups!

Peanut Butter Oat Cups Recipe FAQs
What kind of peanut butter should I use for the best results?
I recommend using smooth, all-natural peanut butter. This gives your Peanut Butter Oat Cups the perfect creamy texture and ensures that they hold together well. Avoid runny or overly processed varieties, as they can lead to a messy mixture that won’t set properly.
How long can I store my Peanut Butter Oat Cups?
You can store these cups in an airtight container in the fridge for up to one week, which keeps them soft and ready for snacking. If you want to keep them longer, freeze them in a single layer and then transfer to a container for up to three months. They’ll be waiting for you whenever a craving strikes!
Can I freeze the Peanut Butter Oat Cups?
Absolutely! To freeze, place your cups in a single layer on a baking sheet first. After they are solid, transfer them to a freezer bag or airtight container. This prevents them from sticking together. They can stay in the freezer for up to three months. When you’re ready to enjoy, just let them sit out for about 5-10 minutes to soften slightly before indulging.
What should I do if my peanut butter mixture is too runny?
If your peanut butter mixture seems too liquidy, it may be due to using a lighter peanut butter. To fix this, increase the freezing time until the mixture firms up or add a bit more oats until the consistency is right. Aim for a thick batter-like mixture that holds together when pressed into molds. Be patient—this step ensures a solid foundation for your cups!
Are Peanut Butter Oat Cups suitable for people with nut allergies?
Yes, you can definitely make these Peanut Butter Oat Cups nut-free! Simply substitute the peanut butter with sunflower seed butter or another seed-based alternative. This way, you maintain delicious flavor and texture while ensuring everyone can enjoy them safely.
What happens if my chocolate topping hardens too quickly?
If your chocolate sets too fast before spreading, it might be due to being overheated. To remedy this, simply re-melt it in the microwave for 10-15 seconds at a time, stirring in between until you achieve a smooth consistency again. For a smoother finish, mixing in a little bit of oil helps keep the chocolate glossy and easy to drizzle.
Delicious Peanut Butter Oat Cups: No-Bake Bliss in Minutes
Ingredients
Equipment
Method
- In a mixing bowl, combine creamy peanut butter and maple syrup until smooth, about 2 minutes.
- Stir in old-fashioned rolled oats until fully coated, about 2-3 minutes.
- Scoop about 2 tablespoons into each cup of a lined muffin tin, pressing down firmly, about 5 minutes.
- Place the molds in the freezer for about 20 minutes to firm up.
- Melt chocolate chips with a splash of oil in a microwave-safe bowl, heating for about 1-2 minutes until smooth.
- Drizzle the melted chocolate over each cup and let sit for about 5 minutes.
- Return the cups to the freezer for another 20 minutes to fully set.
Leave a Reply