
Tucked away in my kitchen one busy afternoon, I discovered that simplicity is often the key to creating something truly enjoyable. When craving a sweet bite but lacking the time for baking, I stumbled upon these delightful 4-Ingredient No-Bake Chocolate Oat Cookies. Not only do they deliver a satisfying chocolate flavor alongside a chewy oat texture, but they are also astonishingly easy to whip up. Perfect for those moments when you need a quick snack or an energizing pick-me-up, these gluten-free treats are truly guilt-free. Whether you’re looking to impress guests or simply want to indulge yourself, these cookies fit the bill—and who doesn’t love a no-bake option? What variations will you try to make them your own?

Why Are These Cookies So Irresistible?
Simplicity at its finest: With just four ingredients, these no-bake chocolate oat cookies come together in a flash, making them perfect for busy evenings.
Rich, chocolaty goodness: The combination of nut butter and cocoa powder creates a creamy, rich flavor that satisfies your sweet cravings while remaining healthy.
Customizable for everyone: Add your favorite nuts, fruits, or chocolate types to make each batch unique. Consider adding some dried fruits for an extra burst of sweetness!
Crowd-pleaser: Whether it’s a quick snack, a post-workout treat, or a homemade gift, these cookies are sure to delight everyone who tries them.
Time-saving: Forget the oven! These no-bake cookies are ready in minutes, perfect for whipping up in between life’s hustle and bustle.
Energy-boosting: Packed with fiber and protein, they offer a nourishing alternative to processed snacks. For an even greater nutritional punch, consider swapping in protein powder!
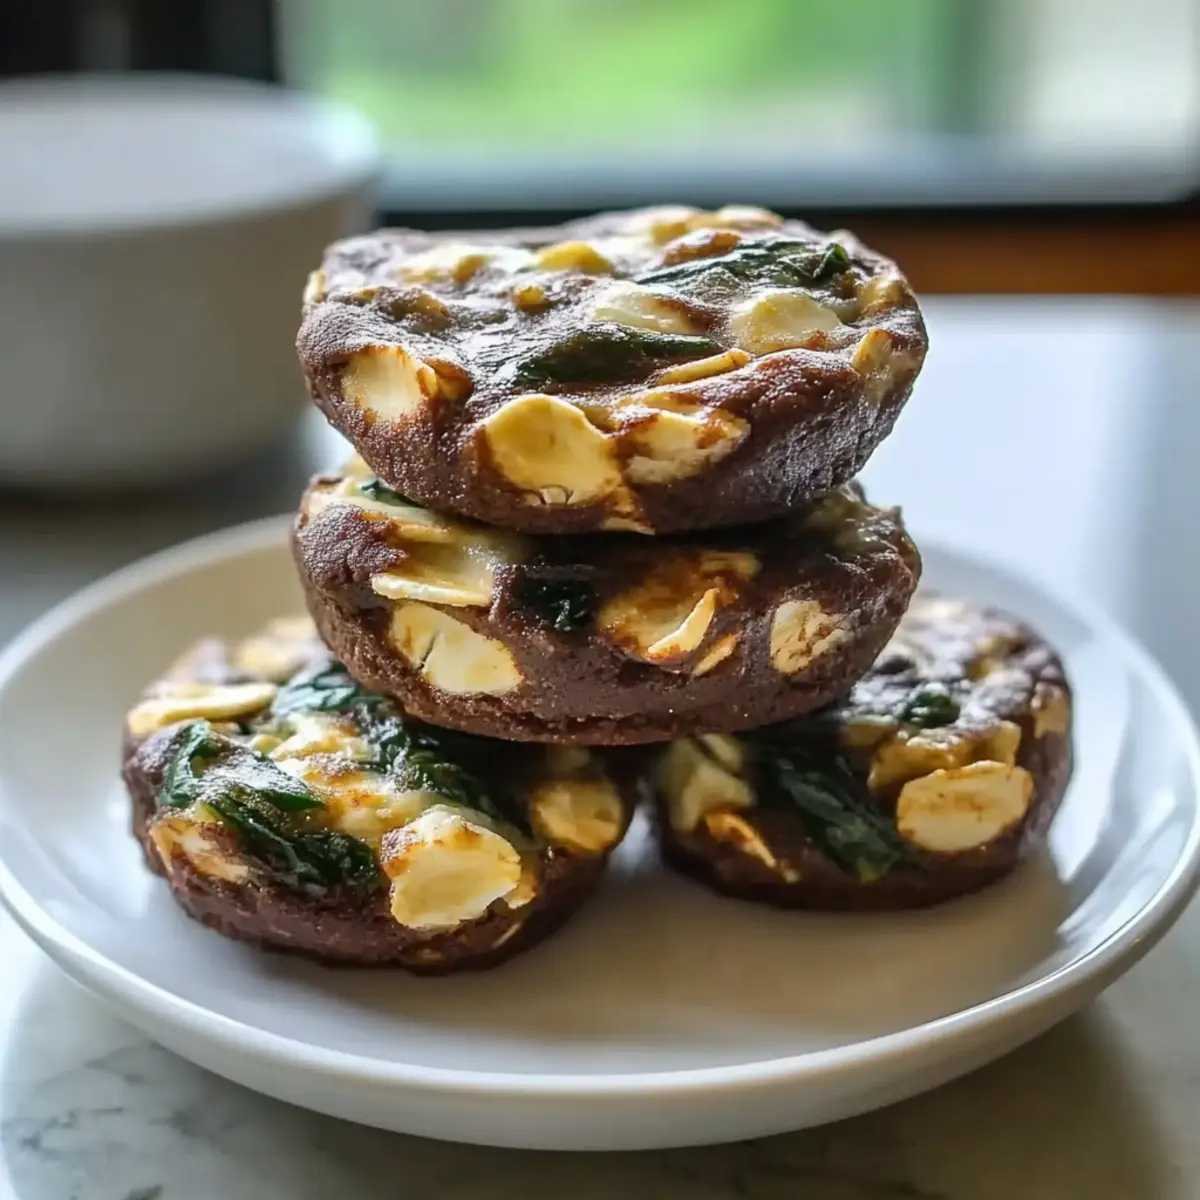
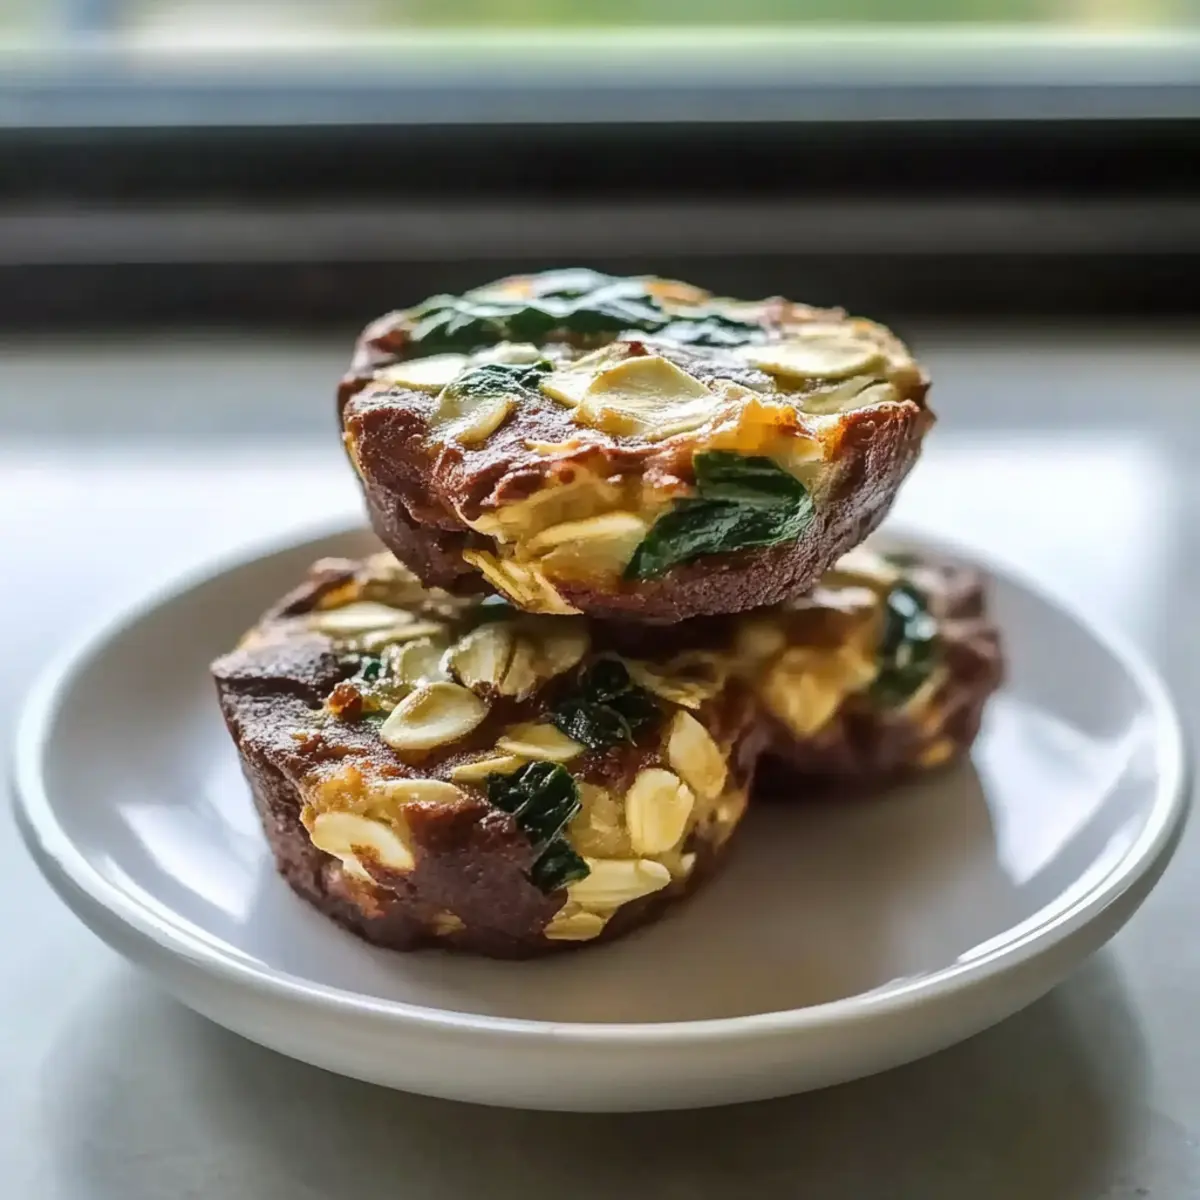
4-Ingredient No-Bake Chocolate Oat Cookies
Perfect for a guilt-free snack!
- For the Cookies
- Oats – Provide structure and chewiness; rolled oats yield the best texture.
- Nut Butter – Acts as a binding agent while adding creaminess; almond butter is a great peanut butter substitute.
- Cocoa Powder – Delivers that rich chocolate flavor; remember to use unsweetened cocoa for the best taste.
- Honey or Maple Syrup – Adds sweetness and binds the mixture; swap honey for maple syrup to keep it vegan.
These simple yet satisfying 4-Ingredient No-Bake Chocolate Oat Cookies are sure to please anyone looking for healthy snacks without the hassle.
Step‑by‑Step Instructions for 4-Ingredient No-Bake Chocolate Oat Cookies
Step 1: Combine the Dry Ingredients
In a large mixing bowl, add 1 cup of rolled oats and ¼ cup of unsweetened cocoa powder. Use a whisk to blend these ingredients together until evenly combined. This creates a solid base for your 4-Ingredient No-Bake Chocolate Oat Cookies. Ensure there are no cocoa clumps to maintain a smooth chocolate flavor in your cookies.
Step 2: Mix in the Nut Butter
Next, stir in ½ cup of your favorite nut butter, like almond or peanut butter, using a sturdy spatula. Mix thoroughly until the dry ingredients are fully incorporated into the nut butter, resulting in a thick, cohesive mixture. This step is crucial as the nut butter acts as a binding agent, ensuring your cookies hold their shape once formed.
Step 3: Sweeten the Mixture
Drizzle in ¼ cup of honey or maple syrup, stirring continuously to blend this sweetener into the dough. The mixture should become moist and easier to manipulate. If it’s too sticky, consider adding a few more oats to balance the consistency. Your cookie dough should now be sticky yet manageable when you’re ready to shape it.
Step 4: Form the Cookies
Using your hands, take small portions of the mixture and press them into cookie shapes. Place them on a lined baking sheet about an inch apart. Aim for a size that’s just a bit larger than a tablespoon for evenness. This final shape will help your 4-Ingredient No-Bake Chocolate Oat Cookies firm up beautifully during refrigeration.
Step 5: Chill to Set
Finally, refrigerate the cookies for at least 30 minutes to allow them to set properly. This step is essential for achieving the desired firm yet chewy texture. Once they’re chilled, the cookies will hold their shape well. After chilling, enjoy these delicious, guilt-free treats whenever you need a quick snack or pick-me-up!
What to Serve with 4-Ingredient No-Bake Chocolate Oat Cookies
Create a delightful pairing experience that enhances your chocolate oat cookies’ rich flavours and chewy textures.
-
Almond Milk: The creamy, nutty flavor of almond milk balances perfectly with the sweetness of the cookies, making it a refreshing sip alongside your treat.
-
Fresh Berries: Juicy strawberries or tart raspberries add a burst of freshness that brightens the indulgent chocolate taste. A fruit medley will elevate your snacking moment.
-
Greek Yogurt: Tart Greek yogurt serves as a creamy dip, offering a protein boost that complements the cookies while contrasting their sweetness. A drizzle of honey on top adds even more flavor.
-
Nutty Trail Mix: A handful of your favorite trail mix brings a delightful crunch and a variety of flavours that pair beautifully with the chewy consistency of the cookies. Consider adding dark chocolate pieces for an extra chocolatey treat.
-
Hot Coffee: The rich and robust notes of coffee create a comforting atmosphere for enjoying your cookies, enhancing the cocoa flavor with a cozy warmth.
-
Coconut Chia Pudding: A spoonful of creamy, slightly sweet chia pudding drizzled with coconut offers a lovely texture juxtaposition to the chewy cookies, making for a nutritious snack combination.
Make Ahead Options
These 4-Ingredient No-Bake Chocolate Oat Cookies are perfect for meal prep enthusiasts looking to save time during busy weeks! You can prepare the cookie mixture up to 24 hours in advance. Simply follow Steps 1 to 3 of the recipe, then store the mixture in an airtight container in the refrigerator to maintain freshness. When you’re ready to enjoy, just shape the cookies and chill them for at least 30 minutes before serving. This method not only ensures that your cookies are just as delicious but allows for a quick snack on hand whenever those cravings hit. Plus, they can last in the fridge for up to three days, ready to satisfy your sweet tooth!
Expert Tips for 4-Ingredient No-Bake Chocolate Oat Cookies
-
Mix Carefully: Ensure your dry ingredients are well-combined before adding wet ingredients; this prevents clumps and ensures an even chocolate flavor in your cookies.
-
Adjust Consistency: If your mixture feels too sticky, don’t hesitate to add a few extra oats. This helps maintain the perfect texture for your 4-Ingredient No-Bake Chocolate Oat Cookies.
-
Shape with Purpose: When forming your cookies, press them firmly to help maintain their shape while chilling. Using a cookie scoop can provide uniformity in size.
-
Chill Time Counts: Be patient during refrigeration; letting your cookies set for at least 30 minutes is vital for achieving that ideal chewy yet firm texture.
-
Storage Secrets: Store any leftovers in an airtight container in the refrigerator for up to a week. You can even freeze them for longer-lasting enjoyment!
Storage Tips for 4-Ingredient No-Bake Chocolate Oat Cookies
Fridge: Store your cookies in an airtight container in the refrigerator for up to one week. This keeps them fresh and chewy, ready for snacking!
Freezer: These cookies can be frozen for up to three months. Layer them between parchment paper in a sealed container to prevent sticking and maintain texture.
Thawing: When ready to enjoy, remove from the freezer and let them thaw at room temperature for about 15 to 20 minutes before serving.
For Optimal Freshness: Always ensure the container is sealed tightly to keep your 4-Ingredient No-Bake Chocolate Oat Cookies at their tastiest!
Healthy Egg Muffins Variations & Substitutions
Feel free to explore these delicious variations and make this recipe your own delightfully customizable experience!
- Vegetable Medley: Add your favorite chopped veggies like bell peppers or spinach for a fresh, nutritious boost. They not only add color but also packed with vitamins.
- Cheese Lover’s Dream: Sprinkle in shredded cheese for creaminess and flavor. Cheddar or feta elevates the taste, bringing a savory twist that’s utterly irresistible.
- Protein-Up: Swap out eggs for egg whites for a lighter, protein-packed version. This is a fantastic option if you’re watching cholesterol or calorie intake!
- Herb Infusion: Incorporate fresh herbs like chives or basil to enhance flavor. Fresh herbs give a delightful aromatic touch, transforming your muffins into a gourmet snack!
- Spice it Up: Add a pinch of chili flakes or paprika for some heat. It’s a simple way to kick the flavor up a notch and tantalize your taste buds.
- Sweet Addition: Mix in a little cooked, crumbled turkey bacon or sausage for heartiness. This adds a savory kick that makes your egg muffins extra satisfying.
- Dairy-Free: Use a plant-based milk alternative or omit dairy entirely for a lactose-free option. Your muffins will still be fluffy and delightful without compromising on taste.
- Seasonal Favorites: Celebrate the seasons by adding seasonal vegetables or proteins for even more variety. Pumpkin or zucchini in fall gives a warm, homey vibe everyone will love!
By swapping ingredients or incorporating a few extras, you can create an endless variety of delicious egg muffins that suit your taste preferences or dietary needs. Don’t forget to check out my suggestions on how to store leftovers for the freshest munching experience!
4-Ingredient No-Bake Chocolate Oat Cookies Recipe FAQs
What type of oats should I use for these cookies?
Absolutely! For the best texture, I recommend using rolled oats. They provide the perfect chewiness without becoming too mushy. Quick oats can work in a pinch, but you might lose some of the delightful texture that rolled oats provide.
How should I store my chocolate oat cookies?
You’ll want to keep your cookies in an airtight container to maintain their freshness. In the refrigerator, they can last for up to one week. If you decide to make a big batch, freezing is also a fantastic option; they can remain in the freezer for up to three months!
Can I freeze the chocolate oat cookies? How?
Yes, you absolutely can freeze them! To do so, layer the cookies between sheets of parchment paper in a freezer-safe container, which prevents them from sticking together. The entire container should be sealed tightly to avoid freezer burn. When you’re ready to enjoy, simply thaw them at room temperature for about 15 to 20 minutes before indulging.
What should I do if my mixture is too sticky?
If you find your cookie mixture is too sticky and hard to shape, don’t worry! Simply add an extra tablespoon or two of oats to absorb some of the moisture. This helps achieve a more manageable consistency, allowing you to form those delightful cookie shapes beautifully.
Are these cookies suitable for anyone with nut allergies?
Great question! While these cookies are delicious with nut butter, you can absolutely adapt this recipe for nut allergies. Substitute the nut butter with sunflower seed butter or tahini. They provide a similar texture and binding without the risk of nut exposure, making them safe for everyone!
Can I use different types of chocolate or add-ins?
Very! The beauty of these cookies lies in their versatility. You can definitely experiment with various chocolate combinations, such as dark, milk, or even white chocolate cocoa powder. Just remember that adding chocolate chips or chopped nuts can also elevate the richness and texture!

Savory Healthy Egg Muffins for Easy Meal Prep Bliss
Ingredients
Equipment
Method
- Preheat the oven to 350°F (175°C).
- In a mixing bowl, whisk the beaten eggs. Add in the diced vegetables and mix well.
- Season with salt and pepper, mixing until evenly distributed.
- Pour the egg mixture into the muffin tin, filling each cup about 2/3 full.
- If using, sprinkle cheese on top of each muffin cup.
- Bake in the preheated oven for 20-25 minutes, or until the muffins are set and lightly golden.
- Remove from the oven and let cool for a few minutes before removing from the muffin tin.
- Chill the muffins in the refrigerator for 30 minutes before serving.
Leave a Reply